Showing posts with label electric. Show all posts

Tuesday

How to Install an Electric Iron and Ironing Board Holder

A hot iron sitting on an ironing board is an accident waiting to happen when there are small children running around your home. Install a device that may be used to store the iron and board safely away and also free up needed space.

Choose the best place for the iron and board to be stored. This may be in a closet or bathroom area, but it should be a room with a door that can be closed in order to prevent access to it by small children. It is also a good idea to store the iron and board in a low-traffic area that is not frequently accessed by guests.
 
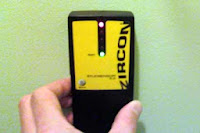
Using an electronic stud finder, locate the left and right edges of a wooden stud inside your wall. Mark the edges lightly with a pencil so that you will know where the middle of the stud is. These marks should be made in close proximity to the position on the wall where you will mount the holder.
 

Position the plastic holder on the wall in the area where you would like it to be permanently mounted. Firmly hold the plastic holder with one hand and with your other hand, hang the ironing board on the holder to be sure the holder is positioned high enough for the board to clear the floor. If there is a door nearby, check it for clearance too. Remove the board from the holder and align the holder so that that center mounting holes are between the pencil lines that you made to mark the wooden stud. Mark these holes using your pencil. It is a good idea to also check the sides of the holder using a level. If the holder is level, the board will hang level when the installation is complete.

Remove the holder from the wall and drill small pilot holes for each mounting hole. The pilot holes should be just smaller than the screw that will occupy the hole. If any of the screws do not match up with the wooden stud, insert a wall anchor to provide extra support. Place the plastic holder back onto the wall and apply screws to each one using your Phillips screwdriver. Do not over tighten the screws!

Insert the iron and wrap the cord so that it fits underneath. Insert the board and inspect the installation from all sides. Pull on the board and make sure the holder doesn't budge.


Related articles
How to Install Automatic Foundation Vents on Your Home
How to Magnetize and Demagnetize a Screwdriver

Wednesday

How to Test Whether a Sensor has a PNP or NPN Type Output Using a Multi meter

If you are replacing a 3 wire sensor which operates on DC voltage, it is important to know whether the sensor's output is a PNP or NPN type. Often this information is printed on the sensor itself, but it is not uncommon for it to be scratched off over a long period of time.

Set the multi meter to DC voltage. This is indicated by either the letters "VDC" or "DCV" or by a symbol which looks like 3 dashed lines over a solid line. There are usually several levels within the DC voltage setting. Choose the "600" level.

The power will need to be ON to perform this test, so use caution when attempting the following. Connect two of the sensor wires to the power supply. If the color combination of the wires is blue, black, and brown, then normally, the blue wire connects to 0v and the brown wire connects to positive volts. Touch the black meter probe to the 0V wire of the sensor. Connect the red meter probe to the signal output wire of the sensor. This wire is normally black. The meter should read "0."

Force the sensor to output. If it is a photoelectric sensor, block the photoelectric beam. If it is an inductive proximity switch, introduce a small piece of metal in front of the sensor. For an ultrasonic sensor or a capacitive sensor, you can just use your hand to make the sensor output. Be sure that the sensor is detecting the object. Many sensors have a small LED that illuminates when the sensor detects it's target.

Watch the meter display as you force the sensor to output. If the readout changes to a number between 10 and 30, then the sensor output is a PNP type, also known as "sourcing." If the meter display remains at "0", then the sensor output is an NPN type, also known as "sinking."

If you believe that the sensor is NPN, there is an additional test that may be done to confirm. Remove the meter probes from the wires. Now place the red meter probe on the positive voltage sensor wire, normally a brown wire. Touch the black meter probe to the signal output wire of the sensor, normally black. When the sensor does not detect it's target, the meter display should read between 10 and 30. When the sensor senses an object, the display should drop to "0." This will confirm that the sensor has an NPN type output.

Related articles
How to Connect a Three-wire DC Sensor to a PLC
How to Automate a Haunted House Using Sensors