Wouldn't it be great if there was an option to clear your browsing history from Internet Explorer 7 without having to click each button under "Delete Browsing History?" There is a simple solution for this.
First, create a shortcut on your desktop. To do this, right click in any open area of your desktop. On the menu that pops up, put your cursor on "new". This should expand another menu. Left click the "shortcut" option. This will open the "Create Shortcut Wizard."
Copy the following text:
%windir%\system32\RunDll32.exe InetCpl.cpl,ClearMyTracksByProcess 255
Now, paste this text into the field under "Type the location of the item." Click the "next" button. Now it will prompt you for a name. Type something descriptive that will easily remind you what the shortcut is for, like "clear IE7 all." Click the "finish" button. This will create a shortcut on your desktop that will, when clicked, erase all history, cookies, passwords, etc. from Internet Explorer 7.
Using your right mouse button, click and drag this new shortcut down to the task bar beside your Windows "Start" button." When you let go of the right mouse button, a menu will pop up asking what you would like to do with the shortcut. Left click the "move" option.
Now you have a single-click shortcut that will erase your browsing history. Try it out. Visit several websites using Internet Explorer 7. Look at IE 7's history to verify that they show up. Now, click your new shortcut and then go check the history again. All gone!
Related articles
How to Snoop-proof Your Computer
How to Permanently Delete Pictures and Files From Memory Cards
A blog with information on almost any topic imaginable . The product of years of trial and error learning.
Thursday
Fix "C:Documents.xls' could not be found" error in Excel
When opening any Excel spreadsheet by double clicking the file, Excel successfully opens, but so does the following error: "'C\Documents.xls' could not be found. Check the spelling of the filename, and verify that the file location is correct. If you are trying to open the file from your list of most recently used files on the file menu, make sure that the file has not been renamed, moved or deleted." This is followed by several more errors referencing similar filenames which do not exist. The spreadsheet will eventually open, but only after much aggravation.
The fix for this problem is simple. Excel must be unregistered and then re-registered. To do this, close your spreadsheet if it is open and exit from Excel. Click the Windows "Start Button" and then click "Run." Type this phrase exactly "excel /unregserver" (minus the quotation marks.) Click the "OK" button and the window will close. Then click the Windows "Start Button" again and click "Run." Type this phrase exactly "excel /regserver" (minus the quotation marks.) Click the "OK" button and the window will close.
Try to open your Excel spreadsheet again by double-clicking the file. It should open this time with no errors. This procedure resets Excel to it's factory defaults in the Windows registry. You should not have to reactivate Excel after performing these steps.
Related articles
How to Print to Tray 3 on a HP LaserJet P2015 Printer
How to Protect Your Company from Fraud and Scams
The fix for this problem is simple. Excel must be unregistered and then re-registered. To do this, close your spreadsheet if it is open and exit from Excel. Click the Windows "Start Button" and then click "Run." Type this phrase exactly "excel /unregserver" (minus the quotation marks.) Click the "OK" button and the window will close. Then click the Windows "Start Button" again and click "Run." Type this phrase exactly "excel /regserver" (minus the quotation marks.) Click the "OK" button and the window will close.Try to open your Excel spreadsheet again by double-clicking the file. It should open this time with no errors. This procedure resets Excel to it's factory defaults in the Windows registry. You should not have to reactivate Excel after performing these steps.
Related articles
How to Print to Tray 3 on a HP LaserJet P2015 Printer
How to Protect Your Company from Fraud and Scams
Labels:
crash,
documents.xls,
error,
excel,
found,
message,
microsoft,
ms,
not,
spreadsheet
How to Install Automatic Foundation Vents on Your Home
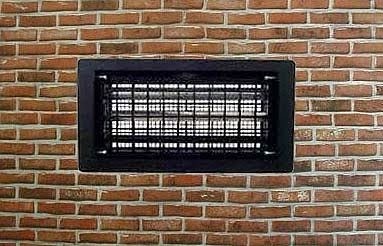
Do you have problems with moisture and mildew in the crawlspace under your home? Do you have a termite infestation? If so, installing automatic foundation vents may be an easy and relatively cheap preventative measure for both problems.
Most old metal foundation vents are equipped with a lever or slide switch which allows the homeowner to manually open and close the vents in response to changes in the temperature outside. Let's face it though, how many people remember to switch these vents at the appropriate times? Leaving the vents open year-round wastes energy and can lead to excess moisture under a home. This creates a perfect environment for mildew to grow and is also a welcome home for termites.
To remove an existing foundation vent, the cement around the vent needs to be chiseled away. Strap on your knee pads or position your stool in front of the vent to be replaced and use the hammer and either a chisel or a flathead screwdriver to tap on the cement around the existing vent. Most of it should crack and fall away. Be sure to only loosen the cement around the vent and try not to loosen any of the bricks.
If the existing foundation vent is made of metal, try to wedge the claw portion of the claw hammer behind one of the metal slats on the face of the vent. Now use some leverage to pry the vent out of the wall. Don't worry about damaging the vent. It should be discarded at the end of the project anyway. When the vent is removed, use the hammer and chisel or screwdriver to remove any excess cement in the rectangular opening left by the absent vent.
Installation may vary depending by the type of automatic vents that you purchase, but the current standard uses metal clips and also pointed screws which apply pressure to the bricks at each corner of the automatic vent to hold it in place. Position each clip and screw in place and then, working against the resistance caused by the metal clips, insert the automatic vent into the opening. Once it is flush with the existing brick wall, tighten each screw carefully.
That's it, the installation is complete. When the temperature drops to approximately 40 degrees F, the vent will close automatically using an internal metal coil. This same coil will cause the vent to reopen when the temperature returns to 70 degrees F. There are powered vents available which include a fan, but these simple automatic vents only use a metal coil and no power to operate.
Related articles
How to Install an Electric Iron and Ironing Board Holder
How to Magnetize and Demagnetize a Screwdriver
Most old metal foundation vents are equipped with a lever or slide switch which allows the homeowner to manually open and close the vents in response to changes in the temperature outside. Let's face it though, how many people remember to switch these vents at the appropriate times? Leaving the vents open year-round wastes energy and can lead to excess moisture under a home. This creates a perfect environment for mildew to grow and is also a welcome home for termites.
To remove an existing foundation vent, the cement around the vent needs to be chiseled away. Strap on your knee pads or position your stool in front of the vent to be replaced and use the hammer and either a chisel or a flathead screwdriver to tap on the cement around the existing vent. Most of it should crack and fall away. Be sure to only loosen the cement around the vent and try not to loosen any of the bricks.
If the existing foundation vent is made of metal, try to wedge the claw portion of the claw hammer behind one of the metal slats on the face of the vent. Now use some leverage to pry the vent out of the wall. Don't worry about damaging the vent. It should be discarded at the end of the project anyway. When the vent is removed, use the hammer and chisel or screwdriver to remove any excess cement in the rectangular opening left by the absent vent.
Installation may vary depending by the type of automatic vents that you purchase, but the current standard uses metal clips and also pointed screws which apply pressure to the bricks at each corner of the automatic vent to hold it in place. Position each clip and screw in place and then, working against the resistance caused by the metal clips, insert the automatic vent into the opening. Once it is flush with the existing brick wall, tighten each screw carefully.
That's it, the installation is complete. When the temperature drops to approximately 40 degrees F, the vent will close automatically using an internal metal coil. This same coil will cause the vent to reopen when the temperature returns to 70 degrees F. There are powered vents available which include a fan, but these simple automatic vents only use a metal coil and no power to operate.
Related articles
How to Install an Electric Iron and Ironing Board Holder
How to Magnetize and Demagnetize a Screwdriver
Labels:
automatic,
foundation,
install,
moisture,
protection,
ventillation,
vents,
winter
Subscribe to:
Posts (Atom)


