An automatic door is not complete without infrared photoelectric sensors to control it. Photo eyes provide a non-contact method to detect people or objects passing through the door and may be used in conjunction with a controller to open the door.
Choose a quality set of industrial infrared photoelectric sensors. It is imperative that sensors are used on an automatic door, not just to open the door, but to prevent the door from closing with a person or object underneath. Photoelectric sensors are ideal for this application because they do not require the door to make contact with the subject to detect their presence. Ultimately, the manufacturer should provide wiring diagrams and installation instructions to help interface sensors or other input devices with the door controller, but the following instructions should give you a general idea of how they should be used.
Mount the photoelectric sensors in a through-beam configuration. This will save you a lot of trouble later. Do not try to mount the photo eyes on one side and use a reflector on the other because you will find yourself constantly cleaning the reflector. Infrared photoelectric sensors provide a stronger and much more reliable beam when they are mounted across from each other. If the photoelectric system that you are using includes an external amplifier, compare the voltage ratings for the photoelectric system and the PLC. If they are a match, connect the output from the amplifier to the door's PLC input card.
Configure the photoelectric system to output all the time, but then take away that output when the photo eyes detect something. This is commonly listed by the manufacturer as a feature known as "Normally Closed", "Light Operate", or "Make Switching." Program the PLC to interpret an output from the photoelectric system as a "false" condition and the absence of that output as a "true" condition. When the PLC reads a "true" condition, it should open the door, and when the condition returns to "false" it should close the door. This does two things, it opens the door when an object is detected and also if the photoelectric system experiences a fault or loss of power.
Related articles
How to Test Whether a Sensor has a PNP or NPN Type Output Using a Multi meter
How to Troubleshoot Photoelectric Sensors
A blog with information on almost any topic imaginable . The product of years of trial and error learning.
Showing posts with label automatic. Show all posts
Wednesday
Thursday
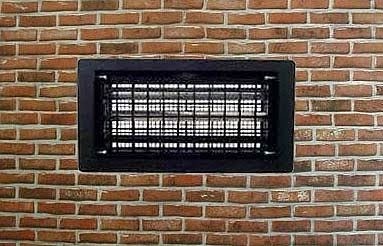
How to Install Automatic Foundation Vents on Your Home
Do you have problems with moisture and mildew in the crawlspace under your home? Do you have a termite infestation? If so, installing automatic foundation vents may be an easy and relatively cheap preventative measure for both problems.
Most old metal foundation vents are equipped with a lever or slide switch which allows the homeowner to manually open and close the vents in response to changes in the temperature outside. Let's face it though, how many people remember to switch these vents at the appropriate times? Leaving the vents open year-round wastes energy and can lead to excess moisture under a home. This creates a perfect environment for mildew to grow and is also a welcome home for termites.
To remove an existing foundation vent, the cement around the vent needs to be chiseled away. Strap on your knee pads or position your stool in front of the vent to be replaced and use the hammer and either a chisel or a flathead screwdriver to tap on the cement around the existing vent. Most of it should crack and fall away. Be sure to only loosen the cement around the vent and try not to loosen any of the bricks.
If the existing foundation vent is made of metal, try to wedge the claw portion of the claw hammer behind one of the metal slats on the face of the vent. Now use some leverage to pry the vent out of the wall. Don't worry about damaging the vent. It should be discarded at the end of the project anyway. When the vent is removed, use the hammer and chisel or screwdriver to remove any excess cement in the rectangular opening left by the absent vent.
Installation may vary depending by the type of automatic vents that you purchase, but the current standard uses metal clips and also pointed screws which apply pressure to the bricks at each corner of the automatic vent to hold it in place. Position each clip and screw in place and then, working against the resistance caused by the metal clips, insert the automatic vent into the opening. Once it is flush with the existing brick wall, tighten each screw carefully.
That's it, the installation is complete. When the temperature drops to approximately 40 degrees F, the vent will close automatically using an internal metal coil. This same coil will cause the vent to reopen when the temperature returns to 70 degrees F. There are powered vents available which include a fan, but these simple automatic vents only use a metal coil and no power to operate.
Related articles
How to Install an Electric Iron and Ironing Board Holder
How to Magnetize and Demagnetize a Screwdriver
Most old metal foundation vents are equipped with a lever or slide switch which allows the homeowner to manually open and close the vents in response to changes in the temperature outside. Let's face it though, how many people remember to switch these vents at the appropriate times? Leaving the vents open year-round wastes energy and can lead to excess moisture under a home. This creates a perfect environment for mildew to grow and is also a welcome home for termites.
To remove an existing foundation vent, the cement around the vent needs to be chiseled away. Strap on your knee pads or position your stool in front of the vent to be replaced and use the hammer and either a chisel or a flathead screwdriver to tap on the cement around the existing vent. Most of it should crack and fall away. Be sure to only loosen the cement around the vent and try not to loosen any of the bricks.
If the existing foundation vent is made of metal, try to wedge the claw portion of the claw hammer behind one of the metal slats on the face of the vent. Now use some leverage to pry the vent out of the wall. Don't worry about damaging the vent. It should be discarded at the end of the project anyway. When the vent is removed, use the hammer and chisel or screwdriver to remove any excess cement in the rectangular opening left by the absent vent.
Installation may vary depending by the type of automatic vents that you purchase, but the current standard uses metal clips and also pointed screws which apply pressure to the bricks at each corner of the automatic vent to hold it in place. Position each clip and screw in place and then, working against the resistance caused by the metal clips, insert the automatic vent into the opening. Once it is flush with the existing brick wall, tighten each screw carefully.
That's it, the installation is complete. When the temperature drops to approximately 40 degrees F, the vent will close automatically using an internal metal coil. This same coil will cause the vent to reopen when the temperature returns to 70 degrees F. There are powered vents available which include a fan, but these simple automatic vents only use a metal coil and no power to operate.
Related articles
How to Install an Electric Iron and Ironing Board Holder
How to Magnetize and Demagnetize a Screwdriver
Labels:
automatic,
foundation,
install,
moisture,
protection,
ventillation,
vents,
winter
Subscribe to:
Posts (Atom)